Download The Second Boer War Worksheets
Do you want to save dozens of hours in time? Get your evenings and weekends back? Be able to teach The Second Boer War to your students?
Our worksheet bundle includes a fact file and printable worksheets and student activities. Perfect for both the classroom and homeschooling!

Resource Examples
Click any of the example images below to view a larger version.
Fact File


Student Activities


Table of Contents
Add a header to begin generating the table of contents
Summary
- The factors behind the Second Boer War
- The key events that occurred during the Second Boer War
- The impact of the Second Boer War
Key Facts And Information
Let’s find out more about the Second Boer War!
- The Second Boer War, also known as the South African War, or to some the Second War of Independence, was fought from the 11th of October 1899 until the 31st of May 1902. It was fought by the British Empire on one side and the two Boer states, the South African Republic (Republic of Transvaal) and the Orange Free State, on the other side.
- The Second Boer War was a defining moment for Britain’s position in the world, as well as for the formulation of its foreign policy in the 20th century that followed the conflict. It became widely known for the guerrilla tactics used by the Boers on the one hand, and for the appallingly poor treatment of prisoners of war by the British Empire.
- In South Africa, most scholars like to refer to the conflict as the South African War as they believe it acknowledges the suffering of both white and black South Africans in 1899-1902.
- Over 28,000 soldiers from both sides died in the conflict. Over 46,000 civilians died, including 26000 Boers in concentration camps and over 20,000 Africans of the 115,000 interned in separate concentration camps.
- The conflict ended after 2 years, 7 months, 2 weeks and 6 days with a British victory. It resulted in the Treaty of Vereeniging and the collapse of The Orange Free State and the Transvaal which were to be administered by the British in accordance with the Treaty.
- In 1910, both of the former republics were incorporated into the Union of South Africa, as part of the British Empire.
- Established in 1653 by Dutchman Jan van Riebeeck, Cape Town became the first European settlement in South Africa. Throughout its expansion, more people settled in the colony, coming from the Netherlands, France, and Germany.
- The Boers were the name given to these people. The term Boer originated from the Afrikaans word which equates to a farmer. Interestingly, the Boers were also part of a wider group of white South Africans known as the Afrikaaners.
First Anglo-Boer War: A Summary
- When diamonds were discovered in the Boer territory in 1868, thousands of new inhabitants arrived in the region — the British people included. To halt their German enemies from controlling the Boer lands, Britain conquered the Transvaal in 1877, securing its British colony in South Africa.
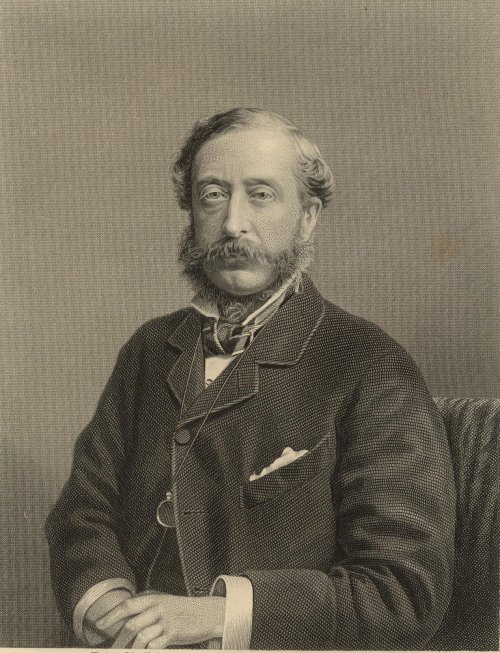
- The idea of establishing a confederation of all the colonised territories of the British Empire, the Boer republics, and the free South African tribes under Britain’s rule was initiated by Henry Herbert, the 4th Earl of Carnarvon, or more commonly referred to as Lord Carnarvon. He served as the Secretary of State for the British Colonies under Prime Minister Benjamin Disraeli from 1868 to 1880.

- The Boers of the Transvaal rebelled against this British annexation, which later became known as the First Anglo-Boer War, or the First Transvaal War of Independence. Lord Carnarvon’s confederation also resulted in the Anglo-Zulu War that occurred in 1879.
- In November 1880, the initial conflict between the Boers and the British happened in Potchefstroom when P. L. Bezuidenhout declined to pay additional fees on his wagon, claiming that he had already paid all of his taxes. The wagon was then seized by British police. Following this, a troop of a hundred men led by P. A. Cronje reclaimed the wagon from the British court officer on 11 November 1880, returning it to Bezuidenhout.
- On 8 December 1880, approximately 8,000 to 10,000 Boer people met at Paardekraal. It was then followed by the election of Boer leaders: Paul Kruger, Piet Joubert and M. W. Pretorius.
- After their appointment, the leaders announced the reinstatement of the Transvaal Republic on 13 December 1880. Three days later, the Vierkleur flag (one of the two flags of the South African Republic) was raised at Heidelberg as a symbol of resistance against the British Empire. This eventually became the turning point of the outbreak of the First Anglo-Boer War.
- During the war, the four major battles took place in Bronkhorstspruit, Laingsnek, Schuinshoogte (Ingogo), and Majuba. Potchefstroom, Pretoria, Marabastad, Lydenburg, Rustenburg, Standerton, and Wakkerstroom were also all under siege.
- There were about 7,000 Boer forces, some of whom came from the Orange Free State. The British, on the other hand, only had an estimate of 1,800 troops deployed around the Transvaal towns. Due to the overwhelming number of Boer soldiers, the British army suffered major blows and defeats, forcing them to retreat. The Boers outmanned the British and had the advantage of knowing their territory. Since they hunted frequently, the Boers were likewise exposed to firearms and good markspeople.
- On 16 February 1881, Major-General Sir George Pomeroy Colley offered to cease fighting should the Boers abandon their demands for Transvaal independence, but it yielded no success. By 26 February 1881, Colley, along with his 554 troops, advanced to Majuba, where the Boers were waiting for them.
- The encounter resulted in a heavy loss to the British, killing 200 of their men, while the Boers only lost two soldiers. Colley was eventually killed in the battle, while the others fled.
- The Boers won this first war. On 8 August 1881, the Transvaal Republic was once again declared as an independent state through the Pretoria Convention, but it remained to be under some British influence.
The Second Boer War: Causes of the Conflict
- The chief cause of the war, as it so often happens, was of a monetary nature. Namely, the British Empire and the states of Transvaal and the Orange Free State disagreed over who had the rights over the newly discovered Witwatersrand gold mines. After months of negotiation, they failed to agree and in October 1899 the tensions came to a blow, resulting in a declaration of war by the Orange Free State and the Transvaal.
- The Witwatersrand gold mines were discovered in 1886 in the Witwatersrand basin near Johannesburg and its surrounding areas. However, many historians claim that they were first discovered by explorer and prospector Jan Gerrit Bantjes in June of 1884. He had been prospecting the area from the early 1880s onwards with his partner Johannes Stephanus Minnaar in the area which is today known as “The Cradle of Humankind.”
- Conflicting reports and ones that form a consensus today state that it was really the British prospector, George Harrison, who discovered the main gold reef. At the time many Brits were keen to believe this as it would credit the nation with the discovery and help justify the claims that Witwatersrand gold mines were British.
- Regardless of who had found them, the discovery of the Witwatersrand gold mines suddenly made the Transvaal the richest country in all of southern Africa. Yet they were equipped with neither the infrastructure nor the manpower to develop this newfound source of wealth themselves.
- South Africa eventually became the greatest producer of gold across the world, providing further economic growth to the independent Boer republics. Great Britain, meanwhile, was in search of a stable supply of gold since the stability of the British pound was dependent on the gold standard at the time.
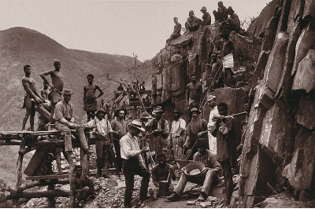
- The gold mine in Witwatersrand in the Transvaal Republic invited an influx of British settlers to the land. By 1890, thousands of South Africans, of both black and white descent, were working in mines. The Orange Free State also benefited from the gold resources in the region.
- The mine attracted a lot of attention from the outside, especially from British expansionists such as Cecil Rhodes. Floods of foreigners, mainly from Britain, came to the Transvaal in search of fortune and employment, often causing tensions between the older settlers, the Boers, and the new settlers.
- The Boers believed that the arrival of uitlanders (foreigners) was a threat to their freedom. For this reason, they imposed the so-called uitlander franchise, preventing foreigners who had not lived in the country for 14 years from voting. This policy created tension between the Boers and the British people.
- Political tensions began to escalate over the rights of the incoming uitlanders within the South African Republic. The Transvaal and the Orange Free State also had disputes with Britain over the gold mining industry and who controls it, and over the British Empire’s intentions to incorporate the two republics into a federation which would be administered by Britain. This made both of the republics resistant to grant the incoming foreigners rights because they knew that before long the majority of the population would shift in Britain’s favour, resulting in the loss of control by the ethnic Boers.
- British Colonial Secretary Joseph Chamberlain demanded that the President of the South African Republic (Paul Kruger) should grant full voting rights to the uitlanders in Transvaal. Meanwhile, Cecil Rhodes (a supporter of the British imperialist plan) and Kruger (who wanted Boer independence) also faced direct conflict with each other.
- The Boer republics taxed gold miners and treated British mineworkers (called ‘uitlanders’) unequally, which brewed dissent.
- In response to the Boer denial to grant voting rights and lighter tax to uitlanders, Rhodes orchestrated a coup d'etat to overthrow the Boer government in 1895.
- The Jameson Raid (29 December 1895 - 2 January 1896)
- Rhodes and Leander Starr Jameson, then British colonial administrator, organised a raid into the Transvaal. The aim was to provoke an uitlander uprising. Around 80 people (mostly British) were killed, and the failed raid was highly embarrassing. Jameson was arrested, convicted and imprisoned. Rhodes had to resign as PM. The raid is considered a key factor in the origins of the Boer War.
- Following a series of escalations involving the buildup of troops, the South African Republic, together with the Orange Free State, declared war on the British Empire.
Phases of the Conflict
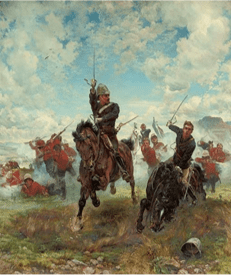
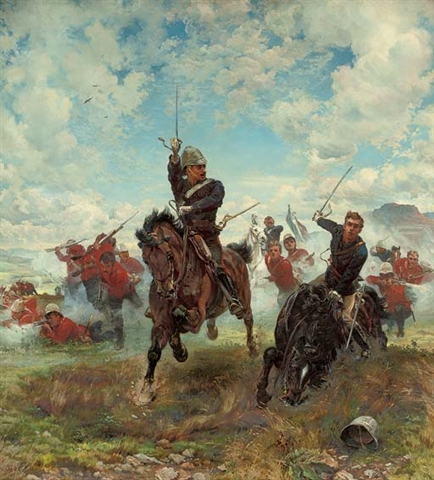
- The Second Boer War infamously unfolded through three phases. While the first two phases were fairly short, the third and final phase lasted over two years (1900-1902).
- In the first phase, the Boers pulled off several pre-emptive strikes into British-held territory in Natal and the Cape Colony. They besieged the British garrisons of Ladysmith, Mafeking, and Kimberley and then secured a series of victories at Stormberg, Magersfontein, Colenso and Spion Kop.
- The Boers emerged victorious in most battles during late 1899 and early 1900. They managed to capture the towns of Ladysmith, Mafeking and Kimberley. On 10-15 December 1899, the Boers won notable encounters at Magersfontein, Colesberg and Stormberg, which later became known as the Black Week.
- During the second phase, the British greatly increased their troop numbers under the command of Lord Frederick Sleigh Roberts. They launched an offensive in 1900 to relieve the sieges from phase one and were successful. After they secured Natal and the Cape Colony, the British army invaded the Transvaal, capturing the capital – Pretoria – by June 1900.
- The conflict could have ended there, but the Boers’ resilience created a third and final phase which lasted a further two years. The Boers conducted a very hard-fought guerrilla war, using various asymmetrical tactics like attacking British troop columns, telegraph sites, railways, and storage depots to gain a strategic advantage.
- As the much weaker side, they resorted to these untraditional guerrilla tactics as it was the only way they were to stand a chance in a war against the British Empire. The Brits retaliated with equally unusual tactics, resorting to cruelty to deny supplies to the Boer guerrillas. They would clear entire areas that they had besieged, destroying Boer farms in their path and moving the civilians into brutally run concentration camps.
- SCORCHED EARTH: To end the war, Lord Herbert Kitchener, Roberts’ successor, continued the scorched earth policy. This policy deliberately destroyed crops and livestock, burned homesteads and farms, poisoned wells and put salt on fields. In the later years of the war, about 30,000 Boer homes and 40 towns were completely destroyed.
- CONCENTRATION CAMPS: To support the scorched earth policy, the system of concentration camps was expanded. Displaced women and children were confined in these camps. About 45 tented camps were built for the Boers and another 64 for native Africans. While many male Boers were sent overseas, native Africans remained part of the paid labour force.
- In August 1900, the first camp was built in Bloemfontein. By December of the same year, Lord Kitchener issued a memorandum that interned women, children and men unfit for military service in the camps. He categorised camps into two types, each given different accommodation and rations.
- Despite being well-planned in London, a lack of proper implementation made the camps brutal and appalling. Living conditions were overcrowded and unhygienic. Food was rationed. Families in the second category received rations with no meat, less rice or potatoes and no vegetables.
- Finally, the conflict ended with the Boer forces surrendering on Saturday, 31 May 1902, and accepting the terms of the Treaty of Vereeniging.
Consequences of the Conflict
- There were several serious and long-lasting consequences of the Second Boer War for both sides of the conflict.
- For the South African states, the most direct result of the war was that the Orange Free State and the Transvaal Republic were annexed into the British Empire. They were promised that they would be given self-government rights in the future, and with the creation of the Union of South Africa in 1910, this promise was finally fulfilled.
- However, the Second Boer War also had many more sinister effects on the local populace. The predominantly agrarian populace and their society were fundamentally unsettled by Roberts and Kitchener’s scorched earth policy. The treatment of the Boer and black African populations which were held in concentration camps and which had gone into exile had a profoundly negative effect on the demography of the region and quality of life there. Not only had many left or been killed, but others could not return to their farms at all. Some attempted, but were forced to leave the farms as the scorched earth policy had caused them to become unworkable.
- These destitute farmers, consisting of both Boers and black Africans, suddenly multiplied the unemployment figures in the country leading to increased competition for work in the gold mines. Now the two groups would not only have each other to compete with for work, but also the uitlanders that had arrived in the previous decade.
- The Concentration Camps
- The terrible conditions of concentration camps were revealed by Emily Hobhouse, a member of the Liberal opposition in Britain. She opposed the British government’s policy on South Africa. A humanitarian and pacifist, she visited SA in December 1900. Upon visiting the concentration camps she returned to Britain to campaign against the camps and was influential in bringing reform.
- In 1901, the Fawcett Commission was established in Britain in response to the treatment of Afrikaners in concentration camps during the Second Boer War. Hobhouse’s initial report and the outcry was a key point in the setting up of this commission.
- Led by Millicent Fawcett, the Six-Woman Commission was tasked to look at the living conditions in concentration camps. Like Hobhouse, Fawcett suggested reforms such as an increase in food rations, use of boilers for drinking water, access to washing facilities and the isolation of sick individuals.
- The Second Boer War also had lasting effects on both British domestic politics and the Empire’s foreign policy throughout the 20th century. Firstly, the British populace was fundamentally disturbed. The conflict was the longest and most expensive (£211 million which is £202 billion at 2014 prices), and the bloodiest conflict that the country had taken part in between 1815 and 1914.
- Appalled by the treatment of the civilian Boers during the war, many people on the British Isles became increasingly wary of the war and joined the “Pro Boer Campaign”. While Britain was ultimately successful in the Second Boer War, the atrocities committed throughout the conflict eventually lost the Conservatives their popularity and mandate.
- Arthur James Balfour succeeded his uncle, Lord Salisbury, in 1903 right after the war. Under his rule, the Conservative Party which had previously won two successive landslide majorities suffered a landslide defeat in the 1906 elections.
- His Liberal successor, Sir Henry Campbell-Bannerman, went on to introduce unprecedented social changes in Britain, including free school meals.
- As Britain began to fear isolation from the recent of the global powers, amid its poor reputation for its treatment of Boers throughout the conflict, Campbell-Bannerman also went on to sign several ententes throughout his rule, including agreements with Russia and France who eventually became Britain’s WWI partners.
Image sources: